Guitar River is reader-supported. We may earn a commission when you make a purchase using the links on our site.
Learn more.
The Five Positions Of The Minor Pentatonic Scale
The minor pentatonic scale is a fundamental scale for both rock and blues. Aside from the major scale, this is one of the first scales that guitar players learn.
What is the minor pentatonic scale? Put simply, the minor pentatonic scale is a five-note scale in a minor key. It is frequently used in blues and rock music, especially for guitar solos. Learning the minor pentatonic scale is essential for guitarists.
There are five pentatonic scale forms or patterns on the guitar. We will take a quick look at each scale form, and how they fit together on the guitar’s fretboard. I’ve included a downloadable PDF of the scale patterns at the end of this article.
The Minor Pentatonic Scale
As the name suggests, the minor pentatonic scale is a five-note scale in a minor key. “Penta,” meaning five, and “tonic,” or tone, broadly speaking.
The five notes of the scale are the tonic or root note, the third, fourth, fifth, and the seventh. Or 1, 3, 4, 5, and 7.
Both the major and minor scales have seven notes. If you compare the pentatonic with the major scale, you’ll notice that the second and the sixth are omitted in the pentatonic scale.
We are not going to spend long on the theory, but instead focus on the five pentatonic scale patterns on the guitar.
If you want to learn a little more about the scale construction, music theory, and how it fits into the modes, checkout the Wikipedia article on the pentatonic scale.
One interesting observation from Wikipedia is that the standard tuning of a guitar contains the notes of an E minor pentatonic scale: E, A, D, G, B, and E.
Scale Positions and Numbering
These scale forms can be referred to by their number as well as their relation to the open chords on a guitar using the CAGED system. We will discuss the CAGED system in another article, but I do want to point out that it impacts the numbering of the scale patterns.
Depending on the guitarist or teacher you learn from, you might know the first scale pattern as either position one or three. The position refers to where the scale form is in sequence along the guitar fretboard.
For this reason, the numbering can be confusing. I’ve seen both numbering approaches used in different training materials.
For the purpose of this article, we are going to go by the standard numbering of these patterns that most guitar players are familiar with. The CAGED system is a more advanced topic we will cover later.
Scale Fingering and Movable Patterns
As the minor pentatonic is often used for blues and rock, the fingering of the scale is flexible. A more academic or classical approach might use fingers two and four in some cases.
For the most part, you will find using fingers one and three easier for blues and rock. We will present the classical fingering here, and some alternate options in the PDF below. Using your third finger instead of your fourth will also be easier higher up the neck when soloing.
These scale patterns are movable. Pattern one on the third fret (G minor pentatonic) is the same as pattern one on the fifth fret (A minor pentatonic).
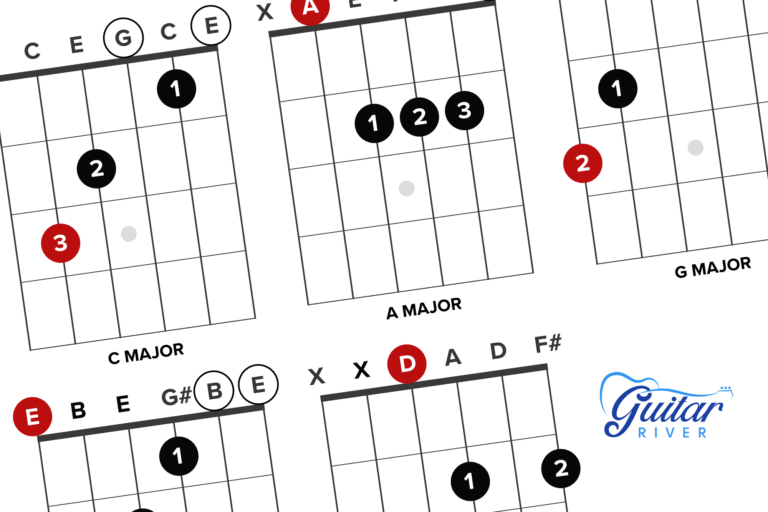
A note on the diagrams: The number corresponds to the finger used to play the note. The red dots are the “root” note, or the note used to determine the key for the scale.
Linking the Patterns
It is important to recognize how these patterns fit together. They are linked so that the top part of one scale form is the bottom of the next scale form.
Once you learn the five positions, the next step is learning how to link them together into musical phrases.
Guitar players often get stuck in an area of the fretboard, relying on one specific scale form. It’s best to find ways to link the scale forms, and just use them to provide structure for your playing.
There are two lead patterns that can help you break out of the box. Aside from those, you will find your own riffs as you become familiar with the scale, and by studying other guitar players.
Enough talk, let’s take a look at the individual scale patterns!
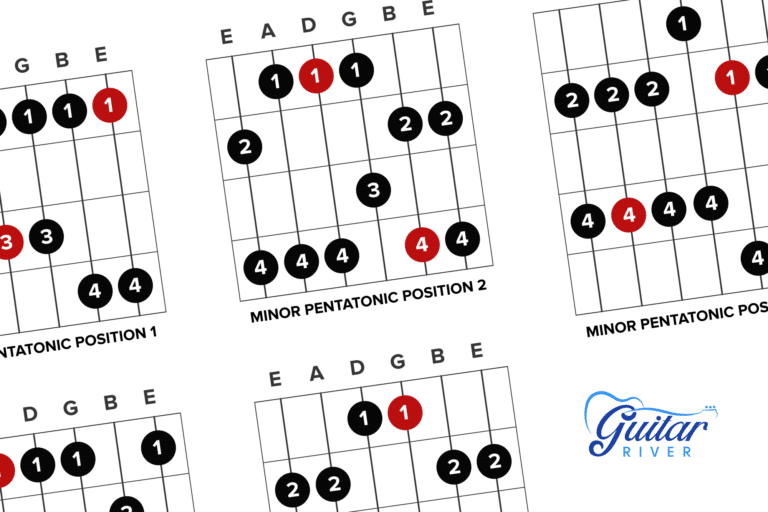
Minor Pentatonic Scale Position 1
Pattern one is usually the one that most players know and learn first. It’s arguably the easiest one to play as well, though the first to fourth finger stretch may not be easy for beginners.
The root note is the first note of the scale on the low E string, making it easy to determine the key of the scale.
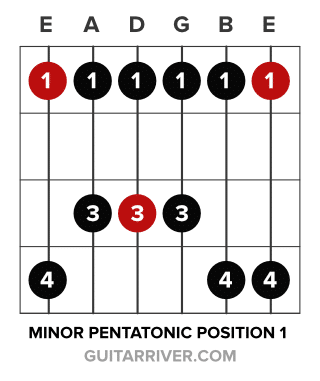
The fingering is pretty standard here, though you might sometimes play the upper notes on the first and second strings with your ring finger instead of your pinky finger. You’ll find that fingering easier especially on the high frets, and when sliding into the second scale shape.
When you later learn the blues scale, you’ll discover this pattern has some great opportunities for bending into that blue note.
Minor Pentatonic Scale Position 2
Moving on to pattern two, note how the bottom part of the scale shape is the top part of pattern one. Make a mental note of this as it is key to linking the shapes together and breaking out of the scale pattern box.

With this pattern, you may opt to use fingers one and three instead of two and four. Again, this will be more appropriate on the higher frets, and when sliding between patterns.
You’ll find some nice riffs moving between pattern one and two on the first three strings.
Minor Pentatonic Scale Position 3
The third pattern of the pentatonic scale is unique in that it has elements of the open D chord shape. You’ll learn more about this with the CAGED system.
You can make use of that shape by adding some dyads to your solos (two note chords).
As you start to get experience with the scale patterns, you’ll find you can slide these dyads to create interest.

The same notes on fingering apply as before—you might find it easier to use your ring finger instead of your pinky finger on the higher frets. And you can substitute fingers two and four for one and three on the E, A, and D strings. Using fingers one and three on the G string can set you up nicely to transition to the B string.
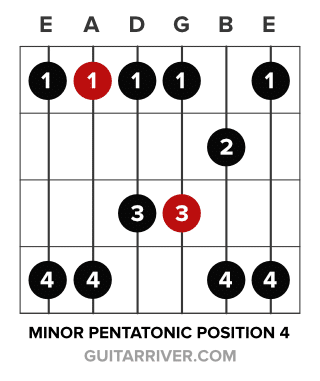
Minor Pentatonic Scale Position 4
The fourth scale pattern is very similar to the first. There are differences on the second and fifth strings. This pattern is also conducive to some nice riffs, and is as comfortable to play as the first pattern.
Minor Pentatonic Scale Position 5
The final pattern is symmetrical and easy to remember. You’ll find opportunities to slide back into the first position, especially starting a riff on the sixth string and moving into the fifth.
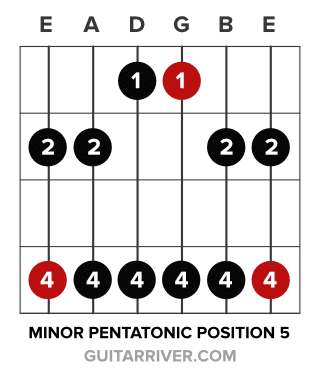
Though the classic fingering would have you start with your second and fourth fingers, you’ll likely find it easier to use your first and third fingers instead.
Transposing to a Major Key
The great thing about learning the minor pentatonic scale patterns is that once you learn them, you already know the major pentatonic scale patterns. The major pentatonic scale uses the same patterns, but starts on a different note.
The easiest way to shift from the minor pentatonic to the major pentatonic is to focus on pattern one. For the minor pentatonic scale, this pattern starts with the root note on the sixth string, fingered with your first finger.
To change the scale to major, move the entire pattern down so that your pinky finger is now where your first finger was. For example, an A minor pentatonic scale starts on the fifth fret with pattern one. Start the same pattern on the second fret, and you have A major pentatonic. Same pattern, major key!
Practice Makes Perfect
Now that you have an overview of all five positions, learn each one, and how they fit together. Try creating musical phrases moving between the different shapes.
Experiment with alternate fingering, and find what works for you. The scale fingering will likely be different on the upper frets, and with certain riffs. As you get more comfortable with the scale, it will become easier to adjust your fingering depending on the context.
Practice with a metronome or backing track. Try not to get stuck in one particular pattern. By understanding how they fit together, you will gain a better understanding of the guitar fretboard.